Friday, May 18, 2012

MUSTACHES + PUN FUN = LOVE

i know...i know...long time no post...i really have been missing you guys...does that count?...but hey...i'm back!...so let's get to crafty business!...hee hee...

so...i've been a huge fan of emma from my creative time and her stamps...yeah...they're the cutest...well...seems that i'm not the only one mad for mustaches...because she did a whole stamp set with 'em!...check it out!...

What'sGrowingOn


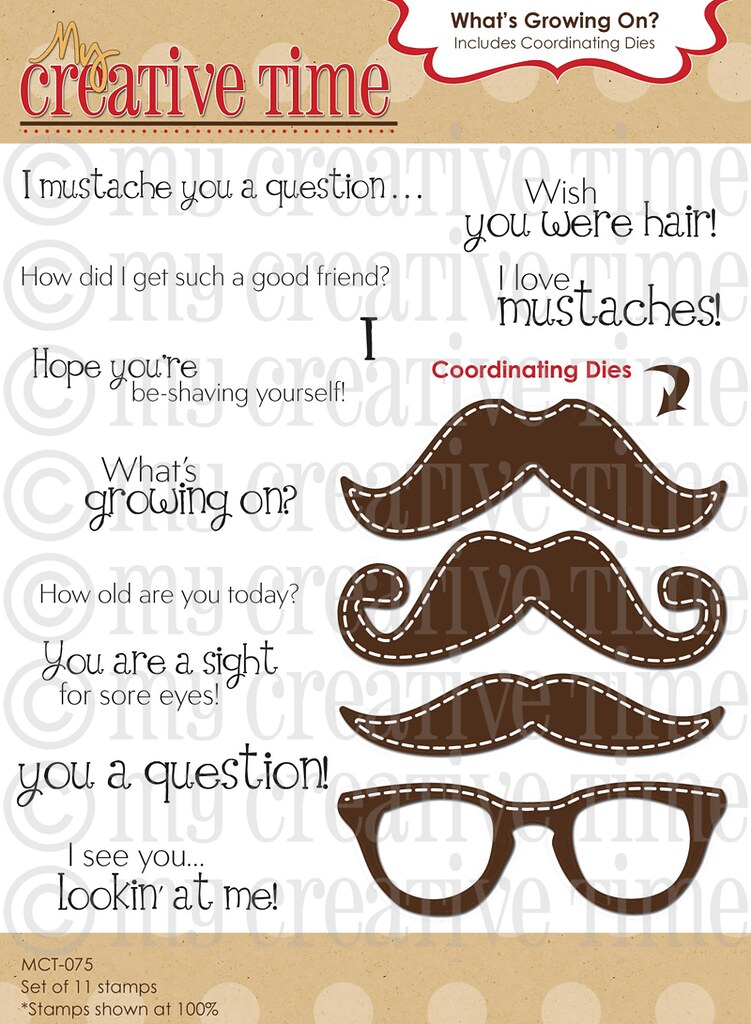
hilarious!...right?...can't get much punnier than that!...there's also dies included too!...you know...those thin metal plates that you run through your die cutting machine...in a couple of cranks...you can have mustaches!...

now...here's where i enter the fun...emma asked me to participate in a blog hop that's she having!...does she really know what she's getting in to?...don't think so...but too late now!...insert menacing laugh here...

i put on my thinking 'stache...and decided to whip up some earrings!...hair they are!...

shrinky dink mustache earrings

grabbed some shrinky dink material...you know me and my dinks...lol...cut two out with the included dies...colored 'em up with a permanent black maker...baked according to the directions...then when all done...slapped some earring backs on there and packaged 'em up!...of course had to add one of the sentiments!...

shrinky dink mustache earrings

and here's where it really gets good!...keep reading!...

***GIVEWAY ALERT***

In honor of Emma's Birthday month, she has decided to give away 12 "Surprise" Gift bags full of goodies! All you have to do is leave a comment here & for MORE CHANCES, leave a comment on ALL blogs in this hop! Also leave a way for us to contact you! Emma will use random.org to pick the 12 LUCKY winners from ALL THE COMMENTS COMBINED!!! So, you actually have 22 chances to win~! Again, All you have to do is leave a comment on all blogs in this hop for more chances to win! The deadline is Sunday, May 20th at midnight! EASY PEASY!!! GOOD LUCK!:)

the fun starts here --> Emma~ http://www.creativetimeforme.com/
Amy ~ http://www.scrappingmommy.com/
Cassandra ~ http://www.ctimz3.blogspot.com/
Cathryn ~ http://inthepinkcathryn.blogspot.com/
Cindy B. ~ http://www.cindybcreations.blogspot.com/
Cindy L.~ http://cindylee77.blogspot.com/
Glora ~ http://glorascrafts.blogspot.com/
Jeanne ~ http://www.jeannespapercrafts.com/
Katie ~ http://www.craftingwithkatie.com/
Kim ~ http://www.scrapinmomofoneinspiringlittleboy.blogspot.com/
Leanne ~ http://createdbyleanne.blogspot.com/
Liz ~ http://www.lizspaperloft.com/
Micia ~ http://yellowbirdcreation.blogspot.com/
Nancy ~ http://scrappingoutofcontrol.blogspot.com/
Nikki ~ http://scrappinnavywife.blogspot.com/
Rosy ~ http://sweetdelightspapernmore.blogspot.com/
Ruthie ~ http://septemberninth.blogspot.com/
Shar ~ http://scrapendipity.blogspot.com/
Tracy ~ http://tracyscricutcorner.blogspot.com/
Trell ~ http://polkadotsandpaint.blogspot.com/
Veronica ~ http://www.vkcreate.blogspot.com/
you are here --> http://thegreenbeanscrafterole.blogspot.com/

thanks for stopping by!...hope you had a 'stashtastic time with the bean!...i know that i loved having ya!...ya'll come back now...ya hear!...lol....and make sure to check out all the wonderful my creative time design team members blogs!...

Saturday, March 17, 2012

PINCH PROOF POLISH

well...'tis the season for green!...and realized that i needed a little something something to make me pinch proof...so i decided to do up my own glitter nail polish!...

diy glitter nail polish

best part...only three supplies are needed!...grab some clear nail polish...got mine at target for .99 cents...glitter...you can use whatever size you want...but i've been eyeing up this tinsel glitter in my collection for a while...and a cake decorating tip...mine came from michaels...a .99 cent price tag again...lol...

diy glitter nail polish

brush a little of the polish on a paper towel...this gives the glitter some room and avoid an overflow...

diy glitter nail polish

grab your decorating tip...this is your funnel...i found this to be the best because a little remover won't hurt when cleaning it up...and it stays put in the bottle...

diy glitter nail polish

then start adding your glitter!...if you're funnel clogs up...i just use a toothpick to "help" it in the bottle...

diy glitter nail polish

fill about a 1/3 of the bottle with glitter...put the cap on and start shaking!...

diy glitter nail polish

all done!...

diy glitter nail polish

now you'll have a little luck 'o the polish too!...and keep those pesky pinchers far away!...but don't stop at st. paddy's day!...imagine all the times that some glitter will make it better!...

oh...forgot to say...that the glitter will keep sinking to the bottom...but just give a little shake, shake , shake before using and you'll be fine!...also...depending on what kind of glitter you use...it can turn the polish a light shade of a color...don't worry...it's so faint...you can't even tell once on your nails!...

****check out my linky party directory to see where i'm linking to this week!...

Tuesday, February 28, 2012

ST PADDY'S DAY - A FESTIVE FLASHBACK

so...while working on some new goodies...thought i'd take you down memory lane with some past pot 'o gold projects...just click on the pics...and magical internet leprechauns will take you to the original posts...i hope...you know how sneaky those little dudes can be!...lol...

 
{magnets 'o luck}


{shamrockin' record keychain}


{leprechaun lather}

Monday, January 23, 2012

SIGN OF THE {VALEN} TIME'S

wowsers...have i really been gone for over a month?...what the heck happened?...where'd the time go?...well...the bean has been under the weather...darn that vertigo!...insert fist shaking here...but now i'm all ready to get my craft on!...

so...how can you say those three little words without actually saying 'em?...in sign language!...and that's how this "i love you" shrinky pin came about!...what's that?...you've never worked with shrinky dinks?...well maybe this little cutie will change your mind!...

 
here's a close up!...this turned out better than i imagined!...

 
i wanted to keep it super simple with the inside...because the front of the card says it all!...

 
using the cricut and don juan cartridge...i cut the hand image at 4" inches...when i work with shrinky dinks...i like to use the deep cut blade...that way you'll know that it'll cut through...

now...don't worry...this can be done without a cutting machine...kick it old school and use scissors!...just trace one of the kiddies hands and take 'er from there!...then it really is a personalized keepsake!...

 
preheat your oven according to package directions...place the shrinky dink on a piece of brown paper bag and then place on a cookie sheet..when oven reaches temperature, put in oven...let bake for about 5 (like the hand's saying) to 10 minutes...they're going to start to curl...don't panic! that's just part of the dinking process!...

 
they're done shrinking when they're all flat again...grab a pencil and take dinks out of the oven...now bend the fingers down over the pencil...you're going to need to move quickly because they cool pretty fast...but don't worry...if this happens, just pop back in the oven and let them get soft again!...

 
all done...add a little heart sticker on there for the finishing touch!...

 
to make it a keepsake...i put a pin back on there!...just slap 'er on with some super glue!...

 
now do you think you're ready for shrinky dinks?...i sure hope so!...because how can you not love this?..


***supplies***
paper - the doodlin' around stack by dcwv
stamp - you had me at chocolate by my creative time with emma
shrinky dinks - for computer inkjet printers (michael's)

oopsie!...i forgot to give you all the machine settings for cutting!...

pressure - high
speed - medium
blade depth - 6
multi cut - 3

****check out my linky party directory to see where i'm linking to this week!...
Related Posts with Thumbnails